Git的三个区:
- 工作区,你看到的目录和代码
- 暂存区
- Commit区/本地仓库
1
2
3
4
|
# 创建本地仓库.git
git init
# 克隆远端工程
git clone [URL]
|
 1
 2
 3
 4
 5
 6
 7
 8
 9
10
11
12
13
14
15
|
# 添加git索引
git add <filename>
git add .
# 删除git索引
git rm <filename>
git rm README.md
# mv用法同linux命令一样 可用于移动和重命名
# 会在文件系统中真正移动文件,再更新git的索引(暂存区)
# 相当于自动执行了
# mv old_path new_path 操作文件系统
# git rm old_path 从git索引(暂存区)删除旧文件
# git add new_path 添加新文件到git索引(暂存区)
git mv <old_path> <new_path>
git mv test.cpp code/
git mv test.cpp new_test.cpp
|
1
2
|
git diff --staged
# 还有个`--cached`参数和`--staged`作用一样
|
这算是最常用的命令,它会告诉你:
- 哪些文件未staged(已在编辑器工作区更改但未add到暂存区)
- 哪些文件未commit(已进入暂存区但未commit到本地仓库)
- 当前开发所在分支
1
2
3
4
5
6
|
# 查看本地分支
git branch
# 查看远端分支
git branch -r
# 查看本地和远端的所有分支
git branch -a
|
1
2
3
4
5
6
7
8
|
# 新建并切换到分支(方法一)
git checkout -b <new_branch>
# 新建并切换到分支(方法二)
git branch <new_branch>
git checkout <new_branch>
# 新建本地分支并跟踪对应远端分支
git checkout -b <local_branch> <remote_name>/<remote_branch>
git checkout -b Br1_local origin/Br_1
|
1
2
3
|
git branch -d <branch_name>
# 强制删除
git branch -D <branch_name>
|
 1
 2
 3
 4
 5
 6
 7
 8
 9
10
11
12
13
14
|
# 从远端服务器中获取某个分支的更新,再与本地指定的分支进行自动合并
git pull <remote_name> <remote_branch>:<local_branch>
# 如果远端指定的分支与本地分支名相同,可省略冒号后内容
git pull <remote_name> <remote_branch>

# 假设远程有一个 feature/xxx 分支,本地还没有
# 可以使用如下命令显式拉取该分支到本地:
git fetch origin feature/xxx:feature/xxx
# 上述命令会在本地创建一个与远端同名的 feature/xxx 分支(⚠️若本地已存在,会被覆盖)
# 然后切换到该分支进行查看:
git checkout feature/xxx
# 若内容检查无误,且你希望将其合并到当前分支(如 main):
git checkout main
git merge feature/xxx
|
git fetch 获取远程分支更新,但不会自动合并,是 git pull 的组成部分之一(pull = fetch + merge)
git fetch origin这条命令会更新本地的远端分支快照,不会自动创建本地分支,也不会改变工作目录,可以使用git branch -r命令体现
我在github上新建了一个test/git-fetch分支,先前的git branch -a没有获取到,因为没有将信息写到本地的.git文件中,使用git fetch更新后,使用git branch -a可以成功获取到新建的远端分支。
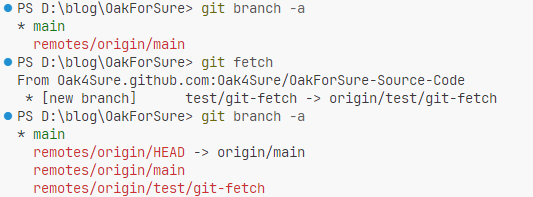
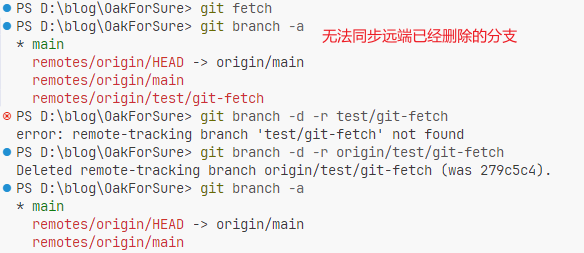
但是如果在github上将test/git-fetch分支删除,再使用git fetch不会自动更新本地已知的远端分支引用。
- 使用
git fetch --prune可以自动检测远程仓库已经删除的分支,并同步删除本地对应的远程追踪分支。
- 或者使用
git branch -d -r origin/feature/xxx手动删除本地仓库对某个远端分支的引用,并不会真的删除远端分支(当远端分支还在,但你本地不想追踪了)。
| 功能点 |
git branch -d -r |
git fetch --prune |
| 手动/自动 |
手动指定分支名 |
自动清理所有已被远端删除的 |
| 是否校验远程状态 |
❌ 不校验(本地直接删) |
✅ 校验远端是否已删除 |
| 推荐程度 |
一般用于个别清理 |
✅ 推荐做日常清理或设为默认 |
| 是否安全 |
安全,只影响远程追踪分支 |
安全,不影响本地真实分支 |
git merge用于从指定的分支合并到当前分支。git会找出二者最近的共同节点base,之后将指定分支在base之后的节点合并到当前分支上。
1
|
git merge <branch_name>
|
1
2
3
4
5
6
|
# 查看远端仓库名字
git remote
# 详细版本
git remote -v
# 查看本地仓库和远端仓库的进度
git log
|
1
2
3
|
git push <remote_name> <remote_branch>
# 将本地分支推送到对应远端分支
git push <remote_name> <local_branch>:<remote_branch>
|
 1
 2
 3
 4
 5
 6
 7
 8
 9
10
11
12
13
14
|
# 回退工作区(not staged)
# 指定文件
git checkout <file_name>
# git checkout可以同时作用于分支,--可以避免git误解为切换分支,语义更明确
git checkout -- <file_name>
git restore <file_name>...
# 回退当前目录下所有文件
git checkout .
git checkout -- .
# 把工作区回退到某个版本
git checkout <commit_id>

# 回退暂存区(not commited)
git restore --staged <file_name>...
|
1
2
3
4
5
6
7
8
|
# 默认最新一次commit
git show
# 指定commit
git show <commit-hash>
# 查看某次commit文件的内容
git show <commit-hash>:<file-path>
# 查看某次commit特定文件的差异
git show <commit-hash> -- <file-path>
|
1
2
3
4
5
6
7
|
# 仅更改commit信息
# 在弹出的编辑器上修改即可
git commit --amend

# 要更改commit的文件
git add <file_name>...
git commit --amend
|
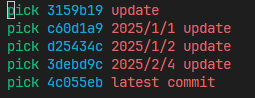
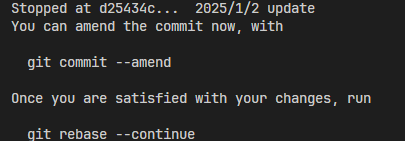
- 比如要修改最近五次的修改
会出现如下信息
 ※ Git rebase
-
根据提示,将要修改的commit改为edit,若只改commit信息修改成reword
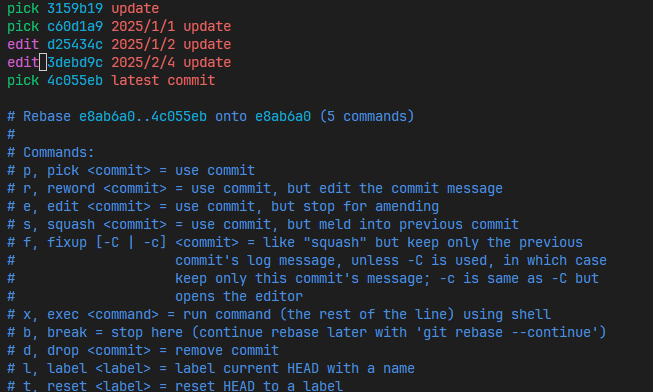
保存退出后git会暂停在选择编辑的commit:
-
对commit进行更改
如果想加入新的文件,则执行git add <file_name>..,方法同更改最后commit,修改结束后根据先前的提示执行git commit --amend,进行commit信息的修改
-
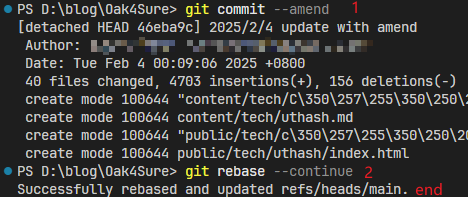
git rebase --continue
如果有多个标为edit的commit,rebase会暂停到下一个commit:
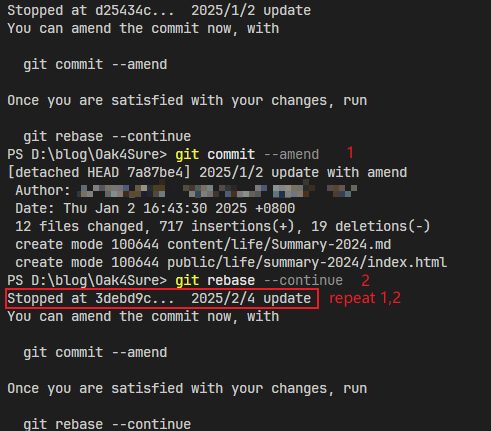 执行同上的
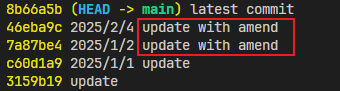
执行同上的--amend和--continue操作,直到所有标为edit的commit修改结束:
为了区分不同的GitHub账号,可以通过编辑~/.ssh/config文件,指定不同的HostName来让Git知道使用哪个SSH密钥进行认证。你可以在~/.ssh/config文件中配置如下:
 1
 2
 3
 4
 5
 6
 7
 8
 9
10
11
|
# 个人 GitHub 账号配置
Host github-personal.github.com
    HostName github.com
    User usr1
    IdentityFile ~/.ssh/id_rsa_github_personal

# 工作 GitHub 账号配置
Host github-work.github.com
    HostName github.com
    User usr2
    IdentityFile ~/.ssh/id_rsa_github_work
|
然后,在使用Git操作时,将仓库URL修改为:
1
2
|
git@github-personal.github.com:usr1/RepositoryName.git
git@github-work.github.com:usr2/RepositoryName.git
|
Host后跟的字符串大小写敏感,config与git配置的链接请务必一致
:前的部分为主机域名,:后的部分是仓库路径,主机域名要修改成~/.ssh/config文件中的Host。
本地git的配置:
1
2
3
4
5
6
7
|
# 查看当前git配置
git config list [--local]
# 主要配好user.name和user.email
# 若比如说work账号是常用的那个
# 那么可以work账号作为global config,personal账号作为local config,仅在需要的仓库配置
git config --local user.email usr1@email.com
git config --local user.name usr1
|